There have been a lot of news stories about Facebook privacy, including personal information being collected and provided to political campaigns.
Fortunately, there are ways to control your privacy on Facebook but it doesn’t happen automatically. You have to take steps to make it happen.
Unless otherwise noted, these instructions apply to the web. All of these controls are also available on mobile but the actual instructions may be a little different
Controlling audience for your posts
The first thing you need to do is to be sure that your posts are reaching only your desired audience. You do that on a post-by-post basis through the audience setting on the bottom of each post, just to the left of the Post button. On mobile it will be above your post and just below your name.

If you click on button (it might say Friends or something else) you’ll see several options including Public, Friends, Friends except (you can specify who shouldn’t see it), Only me, specific friends or custom. This gives you an enormous amount of granular control. You could, for example create a list of friends or family members and send a specific post just to them.
Note that this setting is sticky so it stays in place until you change it. If, for example, you decide to post something to Public, you’ll need to change it back to Friends or whatever you prefer, the next time you post — otherwise that post too will be public.
You can change the privacy of a post at any time.
Activity log
The activity log tells you what you’ve done on Facebook, including what you’ve posted and liked. It’s a great starting point to see if there is content that you should perhaps delete or change its audience by clicking the down arrow just to the right of each activity in your log
You can access your activity log by clicking the down arrow on the top right of each page or clicking View Activity Log inside your cover photo. On a mobile device it’s to the left and below your photograph.
![]()
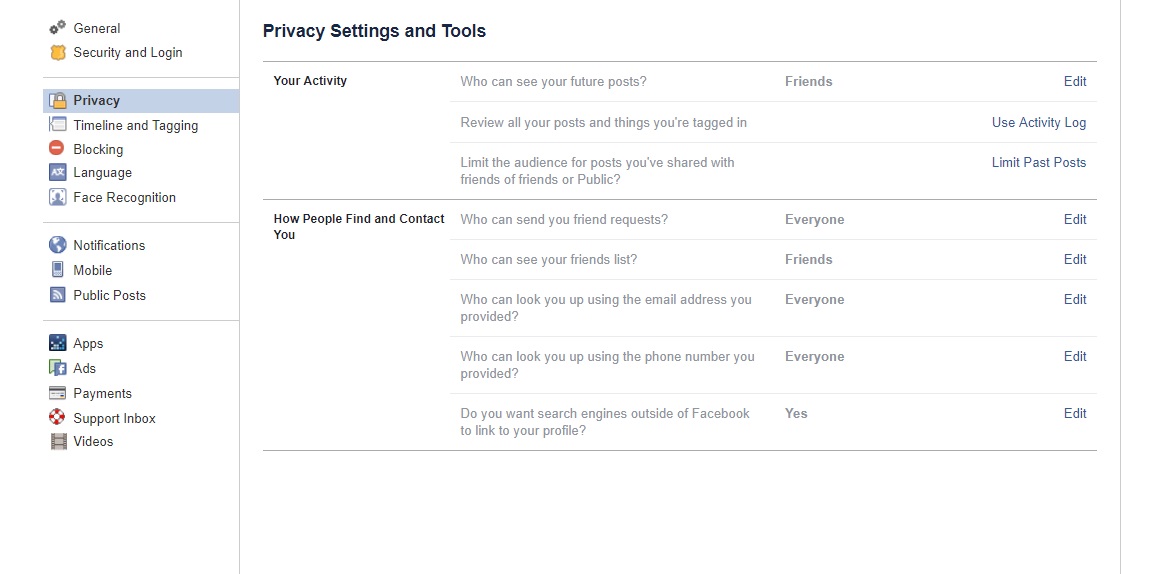
General Privacy Settings
There are some general settings that affect all posts that you can access as follows:
- Click down arrow on top right of any page
- Select Settings
- Select Privacy in the left column of the Settings page
Your Activity
The first option in the Your Activity section is “who can see your future posts,” but note that if you change it when you post, that new setting will remain in effect.
The second option lets you access the Activity Log
The third option lets you limit the audience of past posts that you shared with friends or friends or public. This is a great way to instantly go back and limit the audience on all past posts.
How People Find and Contact You
This section is pretty self-explanatory. It allows you to control things like who can send you friend requests, who can see your friends list, who can look you up via your email address and phone number (keep them as “everyone” if you want to be findable by old friends who have your email address, but restrict it if you’re concerned about people with your email address finding you on Facebook). Finally you get to decide if you want search engines like Google and Bing to link to your profile account. This does not affect Facebook’s internal search function.
Blocking unwanted contact
There are lots of ways to avoid hearing from people, but the most effective — especially if they are going out of their way to bother or stalk you — is to block them. You do this by clicking Blocking in privacy settings.
Your first option is to add a person to the Restricted List so that they will only see what you post to the public or on a mutual friend’s timeline and posts they’re tagged in. They will not see what you post just to friends.
You can also block people completely, which means they will no longer see what you post or be able to tag you or invite you to events. They won’t be able to send you messages. You can always unblock them later by clicking Unblock to the right of their name.
If you scroll down you’ll see other blocking options including blocking messages from certain people, blocking app invites from specific apps, blocking event invites and blocking specific apps from contacting you and getting non-public information about you.
Preventing apps from accessing your information
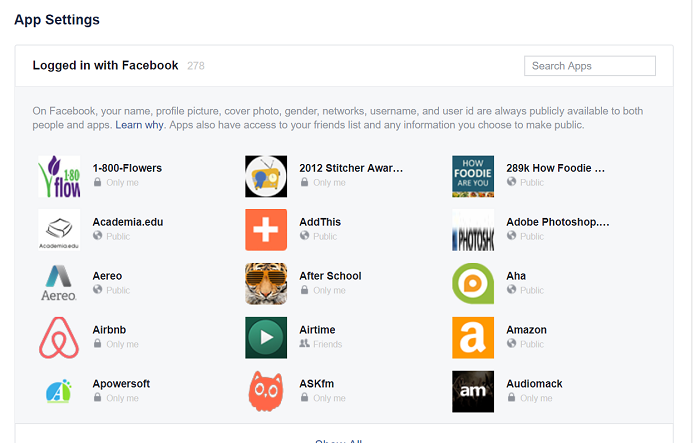
As you may have heard, Facebook has acknowledged that data from Facebook users wound up in the hands of Cambridge Analytica and then to the Trump campaign.
Controlling data accessible to apps
In this case, the culprit was a Facebook app which, like many apps on the service, gathers personal data as a matter of course. And while Facebook may be in the process of tightening its controls over how these apps operate, it remains essential for users to be aware of what apps they’re using and what information they collect.
You can view and control the data apps collect by going to the App Settings page that can can access as follows:
Web: Click on down arrow to the right of your Facebook home page, select settings and select Apps from the left column. That brings up a page for your installed apps. Click on an app to see and edit permissions
Mobile: Click on the 3 horizontal lines (upper right Android and bottom of iOS screen) to bring up the menu and scroll down and click Account Settings and then Apps. Tap on an app to view and edit its privacy settings.
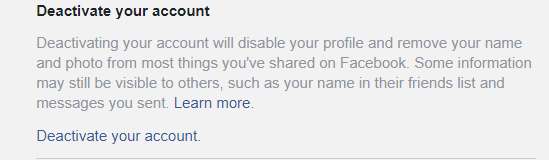
You can deactivate an account and then later reactivate it. While it’s deactivated, people can’t see your timeline or search for you, though some information, such as messages you sent, may still be visible.
If you delete your account, it’s gone forever and can not be reactivated. Facebook says that they “delay deletion a few days after it’s requested” and that a deletion request is canceled if you log back into your account during that period. They further say that it can take up to 90 days to delete data stored in backup systems.
To deactivate an account (with option to reactivate later)
- Click on the down arrow at top left of any page
- Select Settings
- Click in the general tab in left column
- Select Manage Account
- Scroll down to Deactivate your account
- Click Decativate your account
- You are then required to enter your password
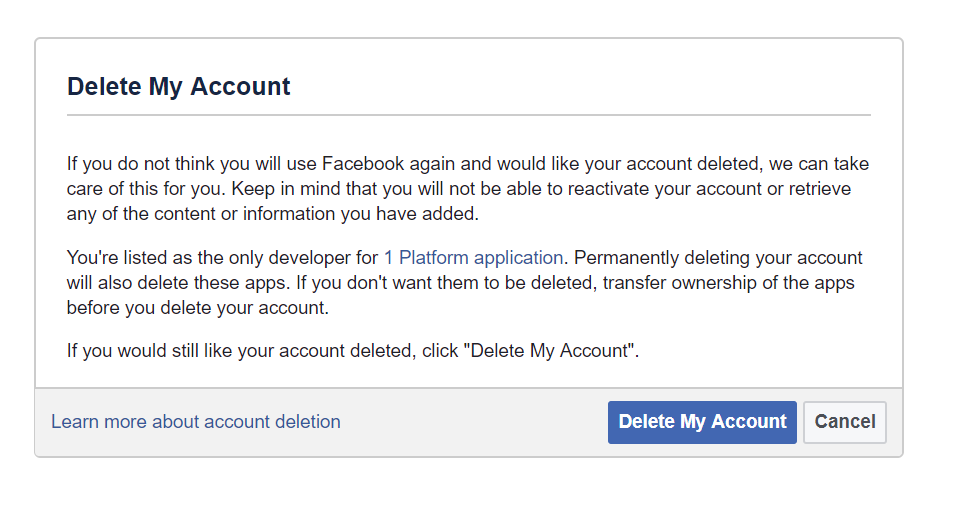
To permanently close your account
You need to click here to notify Facebook of your intention to close your account and then select Delete My Account